
Replacing your kitchen cabinet doors is an excellent way to revitalise your kitchen without having to rip everything out and start over completely. Whether you’re attempting a kitchen refurb on a budget or you just want to give your current kitchen cupboards a new lease of life, investing in replacement kitchen doors is a simple and more affordable option.
It’s advisable to hire an experienced local kitchen fitter to achieve the best results, but since this isn’t always possible, you might be worried about installing the new doors yourself. At first glance, it seems like a complicated and troublesome process, where one wrong measurement could ruin your brand new kitchen door. Though there is measuring, marking, and drilling involved, you don’t have to be a professional to successfully drill hinge holes in kitchen doors.
Don’t worry if you’re not the best at DIY, because we’ve compiled this handy guide for you, with step-by-step instructions to help you install your Kitchen Warehouse door hinges correctly.
Introduction to kitchen cabinet door hinges
Before we get into it, we need to make sure you understand all the parts involved so you know exactly what we’re referring to in the instructions. We’ll be talking about the most commonly used type of hinges, European-style hinges, also known as concealed hinges or cup hinges.
These are much easier to install and adjust than traditional hinges, where you can spend hours fiddling with screws and hinge pins to get things where you want them to be. Concealed hinges simply require one large bored hole and two small screw holes, one on either side of the hinge cup.
Standard hinge holes for these hinges tend to be 35mm in diameter and around 10-12.5mm deep. They should be drilled or bored around 100mm from the top or bottom of the door and 22-22.5mm from the side edge of the door to the centre of the hole.
How many hinges do your kitchen cabinet doors need?
While most standard kitchen doors require two hinges, one near the top and one near the bottom, the number of hinges your kitchen cabinet door needs depends on the size and weight of the door. If you don’t use the appropriate number of hinges or don’t install them properly, the door will sag and bend over time, damaging both the door and the cabinet frame.
The manufacturer’s guide for each product will explain how many hinges are required and supply the correct number with the door itself. Our standard-sized kitchen units are 720mm high by 600mm wide, requiring 715mm by 596mm doors with two hinges each. However, you should always measure the existing doors before selecting replacements to ensure you get the exact same size to fit the unit, especially if your cabinets were made to measure.
Visual guide to kitchen door hinges
To help you understand which parts you need to be looking at during the hinge hole drilling process as you follow the instructions, here is a visual guide to this style of kitchen door hinge:
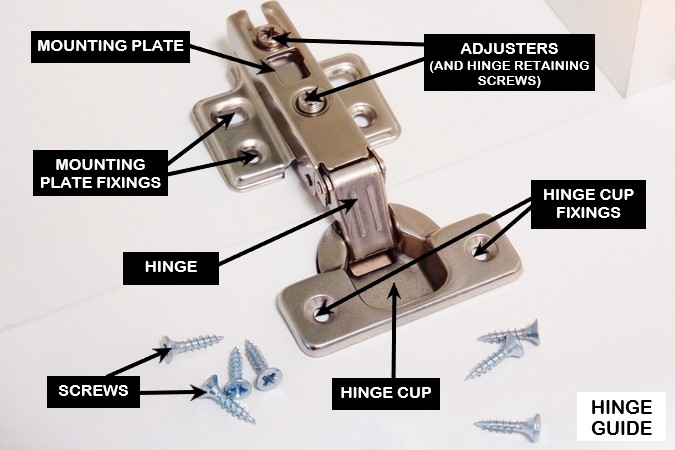
- MOUNTING PLATE – This part will be fixed to the cabinet frame or carcass, sometimes separate from the main hinge.
- ADJUSTERS – These allow you to move the door slightly to the left or right, or in or out, as required until you’re satisfied with how the door sits.
- MOUNTING PLATE FIXINGS – Screws are driven through these holes to secure the mounting plate to the cabinet frame.
- HINGE – The pivoting section that allows the door to open and close, which connects the hinge cup to the mounting plate.
- SCREWS – Fasteners with tapered threaded shafts to secure parts to each other.
- HINGE CUP FIXINGS – Screws are driven through these holes to secure the hinge cup to the back of the kitchen door.
- HINGE CUP – The concealed part of the hinge which sits in a drilled or bored recess.
Now you’re familiar with the kitchen door hinge, you’re ready to move on to actually drilling the hinge holes and attaching the hinges.
How to drill holes for kitchen door hinges
When you order kitchen cabinets from Kitchen Warehouse, they usually arrive pre-drilled for easy assembly, unless the doors are directional and can only be installed one way up. You then have the freedom to decide whether these will be right-hung or left-hung doors and drill the hinge holes yourself accordingly.
Our replacement doors, sold separately without cabinet frames, do not come pre-drilled for the same reason. Instead, we provide a free hinge drilling kit with every purchase of replacement kitchen doors over £400 to make the process incredibly easy for you.
Take a look at our instruction video below to find out how to use this kit to drill accurate hinge holes in your new kitchen doors.
If you’re unable to watch the video or prefer to have written instructions, we’ve helpfully transcribed it below so you can follow our guide both ways. First of all, here’s what each hinge hole drilling kit from Kitchen Warehouse contains:
- A jig (for marking where to drill)
- A 2mm pilot drill bit
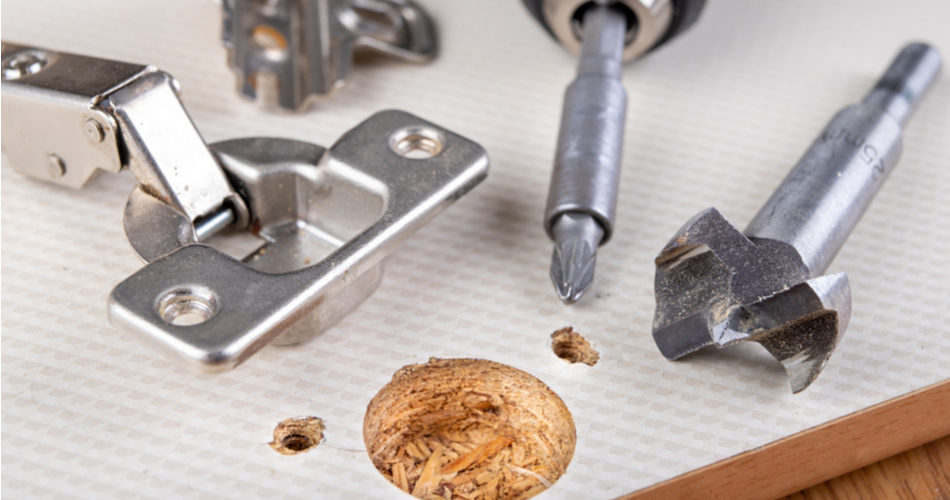
- A 35mm hinge hole cutter (or hinge boring bit)
- Set of instructions
If you’ve never used a jig before, it will revolutionise how you see DIY hinge hole drilling. This tool ensures that you locate the hinge cup perfectly, both vertically and horizontally, at the precise depth to sit flush with the door without accidentally drilling through the door face. At Kitchen Warehouse, we usually centre hinges 99mm from the edge of the door, so the centre point on the jig is also 99mm from the edge of the jig board.
In addition to this equipment, you will also need a pencil and a drill (and a manual screwdriver if preferred). You will also need a solid flat surface large enough to lay each door on while you drill the holes. Using the hinge hole cutter appropriately ensures there will be no damage to the front of the door or the surface below it.
Ready to start drilling the hinge holes? Follow each step below and your replacement doors will be ready to mount in no time.
Kitchen door hinge hole drilling instructions
1) Decide whether the door is going on a base unit or wall unit, and whether it’s going to open from the left or the right (in the video, the example used is a left-hung base unit door). Mark the side the hinges need to go on lightly with the pencil.
2) Take the jig and place the board on its side, lengthways along the edge of the door, ensuring that the bottom edge of the jig board is flush with the bottom (or top) edge of the door. The crosses marked on the jig will now show you where you need to drill the pilot holes.
3) Put the 2mm drill bit into your handheld drill and then drill through each of the 3 crosses lightly to create the pilot holes. This is simply an indication for later, so do not drill too deeply.
4) Repeat this process (steps 2 & 3) at the other end of the cabinet door, so that there are 3 pilot holes at each end where the hinges will be positioned.
5) Put the 35mm hinge hole cutter on your drill. The spike on it is the centre locator, so line the spike up with the middle pilot hole. Now carefully drill into the door until the top of the circular hinge hole cutter is level with the surface of the back of the door. Don’t overdo it – use a gentle rounding motion as shown in the video to bore the recess more smoothly.
6) Remove waste material from the hole, then take a hinge and set the hinge cup into the recess to check that it fits nicely, sitting flush with the door surface and with the hinge cup fixing holes aligned with the other 2 pilot holes.
7) Repeat this process (steps 5 & 6) at the other end of the cabinet door. You should now have 2 large hinge holes with 2 small pilot holes, 1 on either side of each cup.
8) Your kitchen door replacement kit will come with a box containing hinges, fixing plates, screws, rubber buffers, and any handles you’ve chosen. Take out 4 of the correct size screws for the hinge cup fixings (3.5mm x 16mm).
9) Set the hinge cup in the recess and make sure that it aligns properly with the edge of the door and the pilot holes for the screws (you can use an angle finder or a framing square for this if you have one). Then use your regular drill or a screwdriver to drive the screws through the hinge cup fixings until you fully secure the hinge to the back of the door.
10) Repeat step 9 for the hinge at the other end of the door, and there you have it. Two successfully installed kitchen door hinges with perfectly drilled hinge holes.
Once the hinges are on, you can wipe off any dust and stick the rubber buffers on the door interior, on the opposite corners to the hinges.
Now you’re ready to attach your replacement kitchen doors with new hinges to the cabinet frames.
Mounting new kitchen cupboard doors
To start with, you should have unscrewed and removed the old kitchen doors and any hinge backplates from the cabinets. If your new doors have the same measurements and hinge positionings, you should be able to use the existing holes to install the new doors.
To be sure, measure the same distance from the edges of the cabinet as the pilot holes were from the edges of the new door and mark these spots using a pencil. Check that the hinge mounting plates line up with these marks and that the door is vertically and horizontally aligned with the edges of the cabinet frame. Use an angle frame to ensure that the marks are level.
Fitting replacement kitchen doors
When you’re certain that the positioning is correct, you can drill pilot holes into the inside of the frame where the screws will go to secure the new door hinges. Depending on the type of hinge, you can then hold the door in the appropriate position and slide or clip the hinges into place on the mounting plates. It’s advisable for at least two people to do this together to avoid any accidents, especially for heavy or wall unit doors.
After you push the hinges into place, use a screwdriver to tighten the retaining screws. Gently open and close the door to check that it fits well without gaps or rubbing against other surfaces. If you have difficulty opening and closing the door, or if it’s too easy, you’ll need to fine-tune the door using the adjustment screws. These will allow you to move the door slightly up or down, left or right, or closer to or further away from the cabinet frame. We also have a video guide showing you how to do this.
Once you’re happy with the fit of the door, you can repeat the process for your other kitchen doors, ensuring that you balance the neighbouring doors to achieve smooth lines. At Kitchen Warehouse, we always use Hettich soft-closing hinges to ensure the smooth and safe operation of every kitchen cabinet door, so the end result should be very satisfying.
Measuring kitchen cabinet door handles
You should leave the kitchen door handles until last so you can find the height you prefer after you securely install the doors. Use low-tack masking tape to mark where you want the handle to go, by holding the handle to the door and marking your desired location at the top and bottom with pencil and drawing lines down each side of the handle (on the masking tape, not on the surface of the door itself!). Remove the handle and use a ruler to draw a line directly through the centre.
Measure in a straight line from the edges of the door to the centre line at the top and bottom of your handle markings and draw small crosses to mark the points where the handle screws should go. To make sure this is accurate, take your handle and measure the distance between the top and bottom screw holes then apply this measurement to your masking tape handle markers. Hold the handle over the markers to check that the crosses line up with the holes and the handle sits at the height you want it.
Fitting kitchen cabinet door handles
Now you have your measurements for your ideal door handle positioning, apply them to the rest of the new doors so they will all have handles at the same height. When you’re confident that your crosses are all marked properly in the right places, you can proceed to drill pilot holes through the doors at each of these points with your 2mm pilot drill bit.
Next, use a 5mm bit to drill halfway through the door from the front, and then halfway through from the back, for each of the holes. This will prevent splitting the timber or damaging the finish on the front of the doors. Now you can remove the masking tape and place the screws into the holes from the back (inside the door). Hold the handle in place on the other side, so that the holes align with the screws, and start twisting them through with a screwdriver until they’re tight.
Test out your new doors to double-check that you’re content with their positioning. If there’s any protective film on the front of the doors and the handles, you can now peel it off. Voila! Beautiful new kitchen cabinet doors and an entire kitchen that feels brand new.
Looking for replacement kitchen doors for a kitchen makeover?
There are many benefits of replacement kitchen doors, but don’t just take our word for it. Browse our website for yourself to discover a stunning range of replacement kitchen door styles, from signature Shaker doors to contemporary handleless kitchen doors, with a variety of finishes including gloss, matt, textures, and paint. If you need more advice on colours and styles to suit your kitchen, be sure to check out more ideas on the Kitchen Warehouse blog.
If you have any enquiries about our replacement kitchen doors and how to drill hinge holes for them, send us an email at contact@kitchenwarehouseltd.com or give us a call on 01765 640 000 and we’ll be happy to provide further information. Should you be unable to drill the hinge holes and install the replacement doors yourself, it would be best to hire an expert kitchen fitter. Kitchen Warehouse does offer fittings for customers within 60 miles of our base in Ripon (HG4 5LZ), so do get in touch if you’d like our help with changing your kitchen doors.


